

Christmas Patchwork Peasant Skirt
- Craft Cotton Co

- Oct 27, 2022
- 8 min read
Project by Nicole Davall

Fabrics used: Classic Poinsettia Metallic 22 and Holly Metallic 22.
I’m a bit of a general sewist, which means I do a bit of patchwork here, and a bit of dressmaking (usually costumes for my local am-dram group) there. This is a dressmaking project very much inspired by patchwork and quilting. If you’ve got some leftover fabric from previous projects (admittedly large-ish leftovers) then this can be a great scrap busting project too. This version is pretty beginner friendly, but you can adapt it to varying degrees of difficulty by adding pockets or getting creative with the squares (if you’re a little more ambitious with your patchwork!)
A note about gathering, sizing and seam allowance:
Gathering:
This skirt is built in three tiers, with each tier twice the length of the tier above it. There are 8 squares in the top tier, 16 in the one below it, and 32 in the one below that. You could do this skirt using 9 inch wide strips of material, in which case you can get away with each tier being 1.5 times longer than the one above. But when using squares the 2:1 ratio is easier because you know you’ve got to gather two squares into one which gives you a clear guide to help you spread out the gathers evenly.
Waist and hip measurements:
I have used a ½ inch seam allowance which makes the final size of the squares 8x8 inches. The top tier of this skirt therefore measures 64 inches and should fit anyone with a hip measurement of less than that (your hip measurement being the widest part of your hips over your bum). For a sufficiently flared look to the top tier this pattern is probably alright for waist measurements up to about 45 inches. If you want to add more width to the top tier then you can add extra squares. For every square you add to the top tier, you’ll need an extra two in the middle tier and four for the bottom tier, which is an extra 7 squares in total.
Length:
This skirt should end up measuring roughly 24 inches, which on me is just below the knee. If you don’t have that much fabric to work with you can just do two tiers, which would be a length of about 16 inches (an inch or two above the knee on me). This has the benefit of reducing the amount of fabric you need by more than half! Most importantly though, all bodies are different, so take a bit of time to decide what will suit you best and what you’ll feel most comfortable in.
Materials and seam allowances:
If you’re working with fat quarters, you might be a bit hard-pressed to get a decent number of 9 inch squares out of one fat quarter. Because they usually measure roughly 18x22 inches, once you’ve squared them up to be on grain they’re too small in one direction to get two 9 inch squares out of. You can work with 8 ½ inch squares, which still leaves you with a 60 inch width in the top tier without adjusting the seam allowance. Alternatively you can use a smaller seam allowance to achieve the same width, but only if you don’t plan on doing French seams as I have.
What you’ll need:
Materials
Enough coordinating fabric to make 54 9 inch squares plus a little extra for the waistband. This can be pieced from scraps if necessary. If you’re using fat quarters you will need about 16 of them. If using fabric off a bolt you’ll need roughly 3.5m in total.
6 inch zip x1
Closure for the waistband (I’m using a snap fastener because it’s what I had to hand).
Thread. Lots of thread. The colour mostly doesn’t matter as it will be hidden in the seams but you may want a little bit of matching thread for the waistband, the hem and around the zip where the stitching will be visible.
Tools:
A sewing machine (with a zipper foot)
Scissors
Seam ripper
A ruler/tape measure of some description
Pins
Iron and ironing board/mat
Step 1: Cutting out
Iron your material flat, then start cutting your 9 inch squares. If you’re a quilter with a rotary cutter and a quilting ruler, then you can cut your squares in the usual manner. However I cut my squares by making a small nick in the fabric and then tearing along the grain and cross grain. This isn’t as accurate as the quilting method but you don’t need to be super accurate for this project. It also leaves a slightly ragged edge that can fray out if over handled. Ironing your squares immediately after cutting can help mitigate this somewhat. More importantly, however, cut off any loose threads that may appear rather than pulling them out.

Step 2: Layout
Next you’ll want to spend a bit of time deciding how you’re going to arrange your squares depending on what the different fabrics you’re working with look like. Play around with colours and where to place your lights and darks. For example, I’ve put two patches of similar coloured squares together in certain places which will create a checkerboard illusion once everything is gathered in. Once you’ve decided what order you want them in, pile each square on top of each other in order. It’s probably wise to label which pile is which.

Step 3:
Time for the sewing! I recommend starting with the bottom tier in order to get the lion’s share of the work out of the way first. So for the bottom tier you want to sew together 32 squares using a half inch seam allowance. I’ve used French seams for mine because it uses slightly less thread than zig-zagging all the raw edges and gives a neater finish. French seams involve putting the squares wrong side together to start off with, sewing a scant ¼ inch seam, then folding the seam the other way (with lots of pressing to make sure this is nice and crisp) and sewing a more generous ¼ inch seam to encase the raw edges. But use whatever method you’re most comfortable with! Then sew together 16 squares for the second tier, and 8 for the top tier. For tiers two and three you can join the ends up to make a continuous loop (be careful not to twist them!) but leave the top tier open so you can insert the zip.

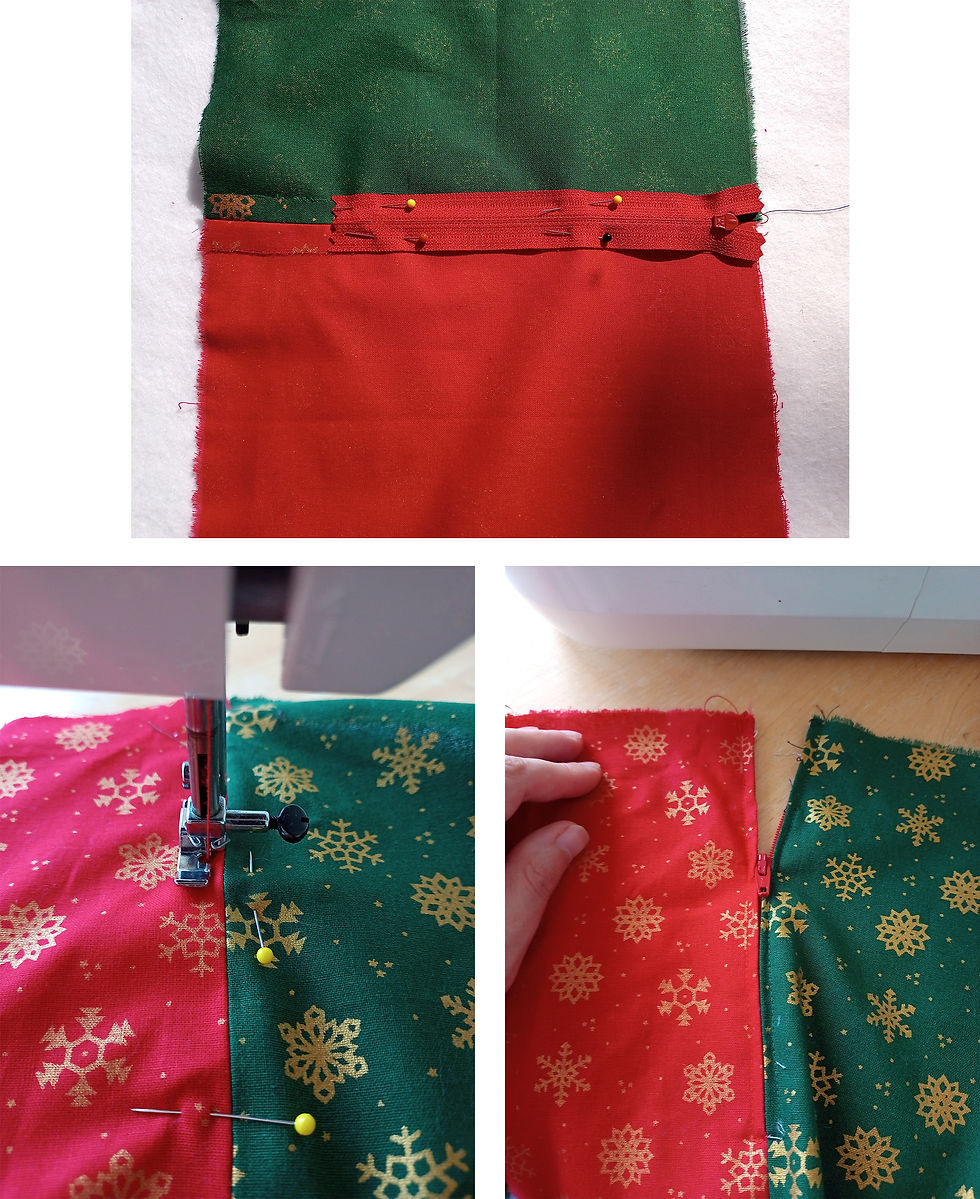
Step 4:
Insert the zip. With right sides together (no French seams possible here!), sew up the opening of the top tier with a ½ inch seam allowance. Press this seam open and position the zip at the top edge, leaving a little room at the top for the waistband seam. Using your zipper-foot, stitch around the zip as close to the teeth of the zip as possible. If you don’t have a zipper foot, you can sew the zip in by hand using a backstitch worked from the right side of the fabric (so that the visible stitching will be as neat as possible). Then, using a seam ripper, unpick the seam in front of the zip, allowing the zip to open.
Step 5:
Press the seams on the bottom and top tier in one direction, and press the seams in the middle tier in the opposite direction. This will make the seams ‘nest’ together nicely and reduce bulk in the adjoining seam. (Note: the picture for this step shows what the nested seams look like in the finished skirt, not the process of pressing them. Also note in the pictures for steps 6 and 7 how I’ve used the hem and the gathering stitches to reinforce the direction I want these seams to lie in)

Step 6:
Hem the bottom tier. It’s a bit easier to hem it now while it’s just one tier and everything is flat rather than later when it’s been gathered and attached to the rest of the skirt. Fold the bottom edge up a ¼ inch, then a ¼ inch again, press it and sew it.

Step 7:
Set your machine to its longest stitch length and run two lines of stitching along the very top of each tier. Make sure it’s well within the ½ inch seam allowance. It can be a good idea to start a new line of stitching every four squares or so in order to gather in sections rather than all at once. This makes everything more manageable and saves a lot of work if the gathering thread breaks because you only have to re-do that section instead of the entire tier.

Step 8:
Then you can start to gather it. It’s possible to use a French seam for this, but the gathering means there’s a lot of bulk in the seam and that can make it very stiff and stop it from hanging properly. So I used a regular seam here and zig-zagged the raw edges. Once again, work from the bottom up. It will be more difficult to gather the bottom tier to the middle tier if the middle tier is already gathered and can’t lie flat. So pin the bottom tier to the middle tier with right sides together matching up two squares on the bottom to every one square on top. Then pull on your gathering thread to gather up the extra length. It’s usually easier to pull on the bobbin thread rather than the top thread, but this may depend on your individual machine. Spread out the gathers as evenly as you can and pin the hell out of it (if you don’t mind spending the extra time you can baste it). Once you’ve got the gathers where you want them, sew the two tiers together on your machine with a ½ inch seam allowance. I put the gathered side down, with the flat side on top as the feed-dogs don’t seem to push the gathers out of position as badly as the presser foot does. Then zig-zag the raw edges and trim back any extra fabric or loose threads.

Step 9:
Repeat the last two steps to join the middle tier to the top tier.

Step 10:
Prepare the waistband. To do this, take your waist measurement, add a couple of inches for ease, and another inch for overlap for the closure, and another inch for seam allowance. Cut a strip of fabric 6 inches wide by whatever that measurement is. You can interface this if you like a firm waistband, but with four layers of quilting weight cotton I generally don’t find it to be necessary. Fold the waistband in half and press it, then fold the raw edges into the centre and press again. With it folded right sides together (ie: with the raw edges on the outside) sew up the ends with a ½ inch seam allowance. Clip the corners, turn right side out, and press again. Then turn it inside out again for the next step.

Step 11:
Leaving the inch overlap at one end, use pins to divide your waistband into 8 sections and use these as a guide to pin your top tier into the waistband. Remember, your waistband is inside-out for this, so only pin it to one side of the waistband.

Step 12:
Gather the top tier down to fit the waistband. Once you’ve got it gathered how you want it, fold the other side of the waistband over the top so that it encases the raw edge of the top tier and pin through all the layers.

Step 13:
From the outside of the skirt (the side that will be seen) sew along the bottom edge of the waistband, trying to catch the bottom edge on both sides as you go. (Stitching it from the outside will mean the outside looks neat, and if you miss parts of the edge on the inside you can stitch it down by hand and it won’t show on the outside! I do this more often than I care to admit...)

Step 14:
Sew the snap fastening (or your preferred closure) into the overlap on the waistband.

And you're done!

To see more from Nicole, follow her on Instagram @nicoledavall!
Made by Nicole Davall for The Craft Cotton Co 2022.


Comments