

Flutterby Wall Hanging
- Craft Cotton Co

- Nov 25, 2021
- 3 min read
Project by Sarah at SJStitchery

A quilted butterfly wall hanging complete with your own flubberbies! Using the new Enchanted Wings fabric by Beth Salt.
Finished size of panel – Approx. 23 x 13 inches
You will need
Selection of 3 fabrics for the blocks and sashing ( Half a metre of each)
Fabric for backing and bias (1metre)
Batting
In R Form by Bosal (for the butterfly details – optional)
Scissors/Thread/Needle/Pins/Rotary cutter and Ruler
METHOD
This quilted Wall Hanging is made up of 3 butterfly blocks which are then sewn together into a panel and edged with simple sashing.
1. Firstly, you will need to make 5 butterfly patches (one large and 4 small).
Choose the two fabrics you are going to use – ideally a floral one for
the butterflies and a plain for the background).
For the one larger block (8 inches when trimmed) CUT;
5 inch squares - One in plain/One in floral
2 ½ inch squares - Three in plain/ Five in floral
For each of the four smaller blocks (4 inches when trimmed) CUT
3 inch squares - One in plain/One in Floral
1 ½ inch squares - Three in plain/Five in floral

2. When all your pieces have been cut for one block, place the two large squares (right sides together) and three of the small squares (right sides together). This will leave two of the floral squares remaining, pop these to one side.

3. Take a pair of squares and on one of the wrong sides of the fabric, draw a diagonal line.

4. Stitch a line either side of the diagonal and then cut up the middle line to form 2 half squares triangles. Repeat for all square pairs.

5. Press all of the seams open with an iron.
6. At this stage, I also trimmed my two remaining floral squares to the same size as my half square triangle pieces (1 ¼ inches square).
7. Lay all your pieces out in the format as shown below and stitch together.


8. Press all pieces with an iron.
9. Trim your block with a rotary cutter and ruler to your finished size. I trimmed mine to a 4 inch square block (or the larger one to an 8 inch square block).

10. Join the two 4 inch blocks together, leaving 3 complete blocks in total for your panel.

10. Your three blocks are now complete, you should have one 8 inch block and two pairs of 4 inch blocks. To separate the blocks, I chose another floral fabric and cut lengths on 1 ½ inch sashing.
11. Attach the sashing to the panels and join all of your blocks together to make one oblong panel as shown.
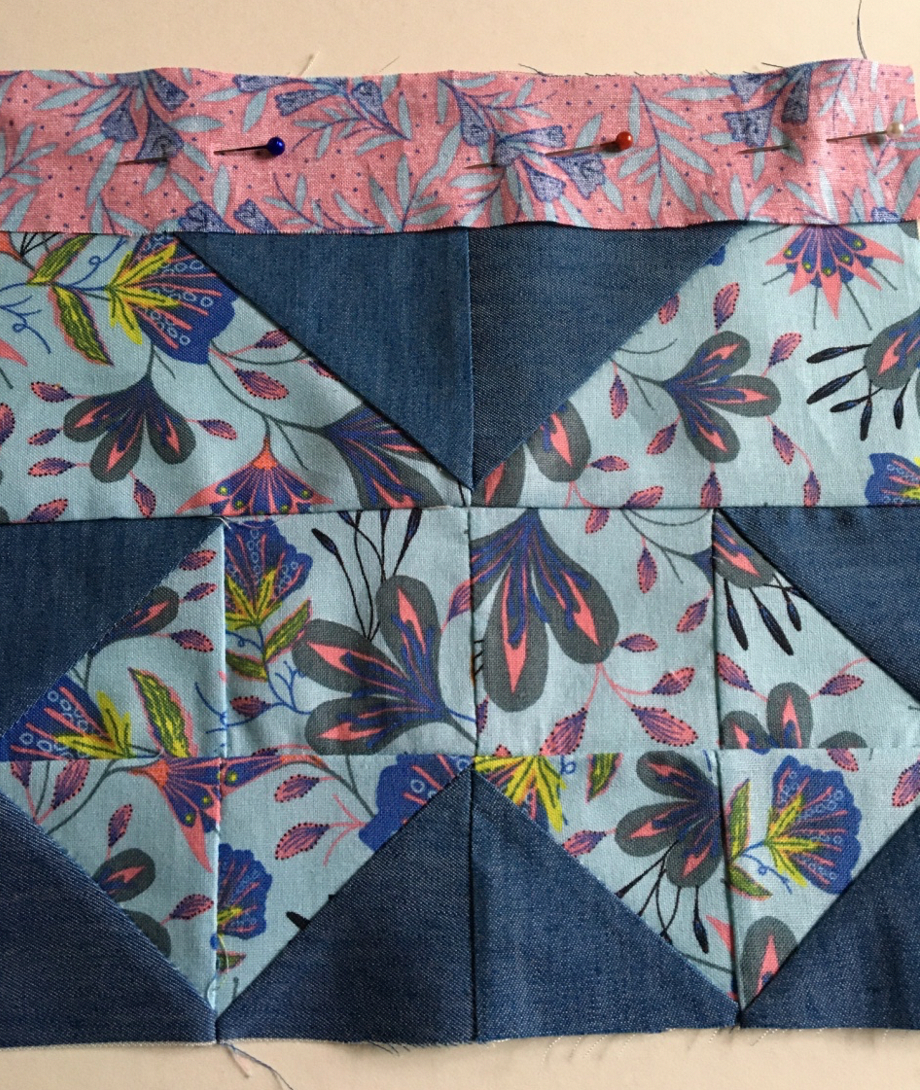

I have also added a contrast sashing to the sides of my panel for extra effect.

12. Press all pieces with an iron.
Your top panel is now complete.
13. Choose a backing fabric and batting for your wall hanging.
14. Quilt as preferred.
15. When your quilting is finished, trim the excess fabric and batting away and neaten any loose threads.

16. Make a quilt binding using 2 ½ inch strips of fabric for make a bias binding.

17. Sew one edge of the binding to the front of the quilted panel and fold the other edge over the back of the panel and slip stitch in place.

Your quilted panel is now complete.
I have added extra detail to my wall hanging by cutting out the butterflies from one of my floral fabrics. I have ironed the butterfly motif onto a piece of In R Form by Bosal (and a backing fabric on the other side). I then cut out the butterfly, zig-zag stitched around the edges and sewed a selection of the butterflies onto my wall hanging.


To see more from Sarah, visit her on Instagram @sjstitchery
Made by Sarah Holliman for The Craft Cotton Company 2021


Comments