

Pumpkin Patch Patchwork Lap Quilt
- Craft Cotton Co
- Sep 5, 2023
- 2 min read
Project by Angela Harkness

Supplies:
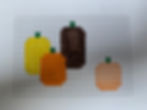
A selection of tonal fabrics for the pumpkins
Background Fabric - 1.5m
Backing Fabric - 1.25m
Green Fabric - 0.5m
Wadding - 1.25m
Temporary Fabric Spray Adhesive
Celebrate all things pumpkin with this autumnal patchwork lap quilt. If you’d like to make it as a table topper, reduce the size of your squares, or supersize them and make a patchwork quilt to snuggle under.
Step 1:
Cut out your fabrics as required:
Pumpkin Fabric a - 28 pieces 2.5” x 2.5”
Pumpkin Fabric b - 30 pieces 2.5” x 2.5”
Pumpkin Fabric c - 40 pieces 2.5” x 2.5”
Pumpkin Fabric d - 25 pieces 2.5” x 2.5”
Green Fabric - 4 pieces 2.5” x 2.5”
5 pieces 2.5” x WOF
Cream Fabric - 235 pieces 2.5” x 2.5”

Directions:
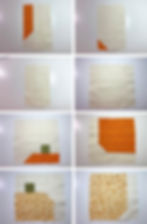
Step 2:
Creating half square triangles:
To determine which pieces get stitched together, refer to the layout chart
Place two squares of fabric right sides together
Check positioning if fabric is a directional print
Draw a line diagonally from one corner to the opposite corner
Sew along the drawn line
Cut ¼” from the line
Open up the seam and press the seam open and flat
Trim down the pieces to give the correct size square (2.5” in this case) **chain piecing here saves time and thread**

Step 3:
Sew the square pieces together in rows, pressing seams open and flat as you go.

Step 4:
Keep referring to your layout and return pieces to your board to keep them in order.

Step 5:
Continue sewing the pieces together to create each row:

Step 6:
Continue sewing until all the rows are sewed together. Keep referring to your layout and return pieces to your board to keep them in order.

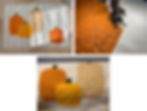
Step 7:
Layer up the quilt front with wadding and backing. Spray baste these pieces together then quilt the front of the quilt as desired...as simple or as complex as you wish! I used the serpentine stitch on my Bernina and stitched across and down each intersection.
Step 8:
Adding the quilt binding:
Make the binding by stitching each of the fabric strips together at a 45 degree angle and attach to the quilt, mitring each corner as you go. Join the ends together to finish. Flip over to the back and hand stitch in place. Then get ready for being cosy on the sofa with a pumpkin spice latte!

Layout Diagram:
To see more from Angela, follow her on Instagram @angerellas_crafts.
Written by Angela Harkness for The Craft Cotton CO 2022.