

British Waterways Wild Daisies Picnic Bag
- Craft Cotton Co

- Sep 13, 2022
- 6 min read
Project by Luke Breakspear

What you will need:
2 - 18”x14” Outer fabric
2 - 18”x14” Inner fabric
2 - 18”x14” fusible lining (I use white and the heavy stuff, give the bag more substance).
2 - 22”x 8” of outer fabric to make handles
2 - 22”x8” fusible lining
2 - 6”x2” foam pieces
1 - 14”x6” pocket fabric.
1 - Set of magnetic clasp and backings
Sewing machine
Quilting yarn (colour of your choice)
Scissors and or cutting board and knife
1 - 2”x2” cardboard square for measuring corners
Iron on a medium / high heat
Clips or pins
So to try and make this a bit easier to follow I have broken this down into stages. Prep, handles, pocket, inner, outer and final stage.
Prep
1. Cut outer fabric to size.
2. Cut inner fabric to size.
3. Cut handles to size.
4. Cut out all fusible linings.
5. Set up your sewing machine. I use a standard piecing foot with just a regular stitch size. I don’t go small stitches on this as it can pull a bit too tight where the handles attach.

6. Placing the 18”x14” fusible onto the wrong side of the outer fabric, press with a medium to hot iron securing it in place. You will need to do this twice for both pieces of outer fabric.

7. The bumpy side of the fusible goes face down and only iron the smooth side otherwise your iron will stick to it!
8. Taking the two handle pieces fold them in half on the longest edge. Then fold the outer edge into the centre. When you open it out you should have four long panels.

9. Place the thin strip of fusible lining into one of the panels and press to secure. You will need to do this for each handle.

10. Fold back inwards and secure with clips.

Handles:
1. Fold the handles in half to find the mid point, either press or mark with erasable fabric pen.
2. Place one foam insert at the half way point.

3. Sew along the open edge with approximately 1/8” seam to close the handle. Go slowly near the foam as the fabric can shift.

4. Repeat on the closed edge for symmetry.
5. Feel on each handle where the foam starts and ends, secure it in place by sewing across the handle at either side of the foam.

6. Put the handles to the side, you will need to attach them later.
1. Fold pocket material so it is approximately 7”x6”.
2. Sew all three open sides with a 3/4” seam allowance. Make sure you leave a gap on one edge so you can turn the pocket out.

3. Once sewn, trim all four corners slightly so the turn out is smooth.
4. Turn out the pocket and press with an iron.

5. Take one piece of the inner fabric and fold in half to find the centre point.
6. Fold the pocket in half to find its centre point.
7. Place pocket 2-3” down form the top of the lining matching the centre points up and pin.

8. Sew with 1/4” seam allowance on the left, right and bottom sides of the pocket. Ensure you back stitch at the start and finish to secure it.
Inner
1. Place the two pieces of inner fabric right sides together.
2. Sew left right and bottom sides with a 1cm seam allowance. On one side ensure you leave a gap so you have a turn-out space.

3. Using your 2”x2” cardboard piece, mark with an erasable pen the two bottom corners, both left and right. I line up the cardboard on the inside of the stitches I have already made.

4. Carefully cut the two corners off.

5. Press the seams open, as this will make it easier to match seams ready to close and ‘box’ the corners.

6. Open each corner out and match the seams to make the boxed edge and clip in place.

7. Sew along each boxed edge with a 1cm seam allowance. You can turn this out when you have done this and it should look like this.

8. When both corners are sewn, leave it inside out, with right sides facing each other.
9. I add two small pieces of fusible lining here where I want the magnet fastener to go. I add this now as it can be fiddly doing it at the end.
Outer
1. Take both outer pieces and decide which of the longest edges will be the top. This will depend on the pattern of your fabric. (I once made a rookie mistake sewing the top closed so I had an upside down bag).
2. Fold both in half on the stop edge mark or press the centre point.
3. 3” from the centre point place one handle and pin in place to it ‘hangs down’. Repeat on the other side so you have a handle pinned to each outer fabric piece.
(Depending on how long you want your handles you can extend the handle edge past the top of the outer fabric)

4. Sew both handles in place with 1/4” seam.
5. Place both outer pieces right sides together (same as the inner) and sew down the left, right and bottom sides. If you have a makers label, ensure you insert it before sewing, otherwise you will find yourself unpicking.
6. Using your 2”x2” cardboard piece, mark with an erasable pen the two bottom corners, both left and right. I line up the cardboard on the inside of the stitches I have already made.
7. Cut out the corners.

8. Match the seams of each corner and sew with a 1cm seam.
9. You can now turn the outer pieces right side out and you have the shape of your bag.

10. Place the outer bag inside the inner bag, taking care to place the handles down and in between both.

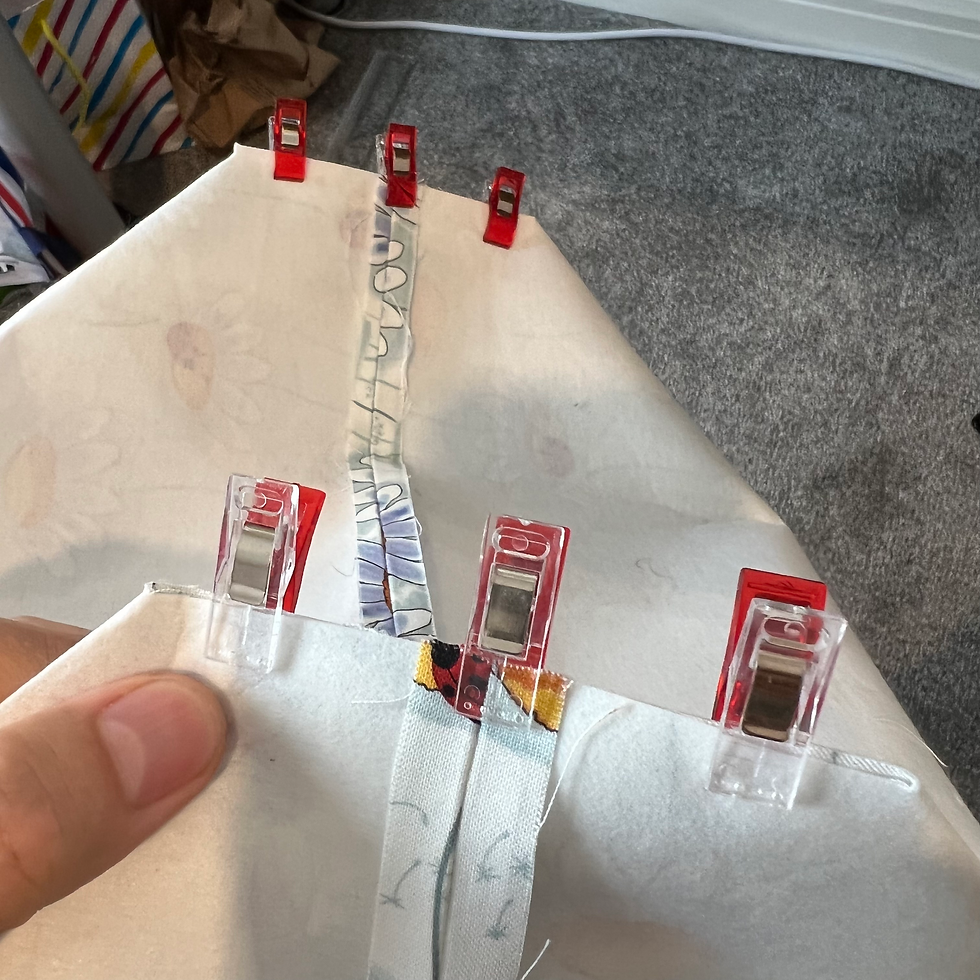
11. Match and clip both seams of the inner and outer pieces together

12. Clip around the outside edge of the top taking care to match the top edges of fabric together.

Final Stage - bag construction and finishing:
1. If your sewing machine has a detachable drawer, I would say take it off, as you will need to rotate your bag as you sew the top edge together.

2. Sew around the whole circumference of the top edge, effectively sealing the bag up. I use a generous 1cm seam as it captures the top edge and handles.
3. This is my favourite bit of the make. The turn out! You will have to pull the bag inside out through the opening you left in the lining pieces.

It can be a little tight depending on how big a gap you left yourself. Once turned out you should see an almost finished bag.

4. Manipulate the bag so that the lining sits comfortably inside, pushing the box corners out to meet each other. This should bring your top edges flat. If it doesn’t, do a bit of wiggling so that the top edge of the opening of your bag is flat. I often press with an iron to get that crisp edge. Once pressed flat, sew again around the whole circumference of the top edge with a 1/4” seam.

5. You now need to mark where your magnet fastener will go. I use the backing to mark the two holes I need to cut. Do this on both inner pieces taking care that they both match up centrally.

6. Using a stitch ripper, carefully cut along all lines drawn. Don’t go too fast as you might end up slipping and making a bigger hole than you intended.

7. Place both parts of the fastener on each side and seal with a backing plate.

8. You can now sew along the edge of the inner fabric to seal the pulling hole.

9. I like to finish by pressing the front and back of the bag to get rid of any unwanted creases from the pull through.

Congratulations you have finished your bag! It should end up being approximately 10” tall, 13” wide and 4” deep.
This is a versatile little bag which can be used as an occasionally picnic bag, beach bag or just day to day handbag. I’ve had lots of requests for them. All in all if you make it start to finish it should take 2-3 hours.
Have fun making them!

To see more from Luke follow him on Instagram @lukeyboyoriginals.
Written by Luke Breakspear for The Craft Cotton Co 2022.


Comments