

Monochrome Zoo Quilt
- Craft Cotton Co

- Jan 10, 2019
- 4 min read
Updated: Apr 14, 2020

Follow my tutorial, on how to make your very own ‘Monochrome Zoo Quilt’ These super cute fabrics are available from ‘Craft Cotton’.
Please read through all the instructions before starting your project Finished size: 42” x 43” (perfect cot/playmat size)
Materials to make this quilt
• FQ bundle of ‘Monochrome zoo’ fabrics
• FQ of pink with white ‘v’ print
• 1 metre of blue with white ‘v’ print
• 1 metre of black blender • 1 metre of black with white ‘v’ print
• 44” square of Craft cotton heritage wadding
• FQ of H250 fusible interfacing by vlieseline
• FQ of bondaweb by vlieseline
• Gutermann thread, colours 1001, 372, 1292
Haberdashery items • Iron-away marker pen, dark and white • Quilters ruler, rotary cutter/scissors • Iron • Cutting mat • Basic sewing supplies • Balloon template • Pins, or basting spray 505
Making the centre panel… Step 1: Cutting • Cut two 8 ½” squares from the H250 interfacing • Cut one 8 ½” square from blue fabric • Cut one 8 ½” square from pink fabric • Cut two 12” x 34” piece from the black blender • Roughly cut around 12 zoo animals Fuse the pink and blue squares to each piece of the H250 interfacing. Use the Balloon template, draw around it 6 times of each piece, using the dark erasable marker pen.

Step 2
Fuse the zoo animals onto the Bondaweb, and carefully cut out leaving about 3/8” of the white background.

Step 3
Arrange the zoo animals onto the black panel, once you’re happy with the placement, pin the balloons and fuse the animals in place.

Step 4
Using the white fabric marker, add the string detail from the balloon to the animal hands or mouth, use the dark marker pen to add the bow details on the balloon. Free motion quilt around each balloon, animals and sew over the pen marks.

Step 5
Trim panel to measure 12” x 33”

Step 6 - Making the blocks … Make 12 blocks, 4 of each of the three designs. Design One:
Cloud fabric: 7 ½” x 11 5/8” Zoo animal circles fabric: 4 ½” x 6 1/8” Black with white ‘v’ fabric: 4 ½” x 6 1/8” Press seams towards darker fabric Make 4 of these blocks

Design Two:
Cloud fabric: 2 1/8” x 4 ¼” Zoo animal circles fabric: 9 ½” x 11 5/8” Black with white ‘v’ fabric: 2 1/8” x 4 ¼” Elephant print fabric: 2 1/8” x 4 ¼” Press seams towards darker fabric Make 4 of these blocks

Design Three
Black with white ‘v’ fabric: 11 3/8” x 6 1/8” Elephant fabric: 11 3/8” x 6 1/8” Press seams towards darker fabric Make 4 of these blocks

Step 7
Join 1 of each design together to create a row of 3, nest seams where the seams join, make two of these rows.

Step 8
Using the remaining blocks, create two further rows.

Step 9
Take one of each row designs, and join to the ‘Balloon’ panel, using ¼” seam allowance - see photo below for placement.

Step 10
Trim main block if needed. Cut two strips from the black blender fabric measuring 2 ¼” x 34 ½” and sew to the two shorter sides of the quilt, then cut two strips measuring 2 ¼” x 36 ½” and sew to the remaining sides. From the pink fabric, cut two strips measuring ¾” x 36 ½”, and two strips measuring ¾” x 37 ½”. Fold in half along the width (wrong sides together) and press. Using 1/8” tacking stitch, join the folded pink strips to the quilt.
Step 11
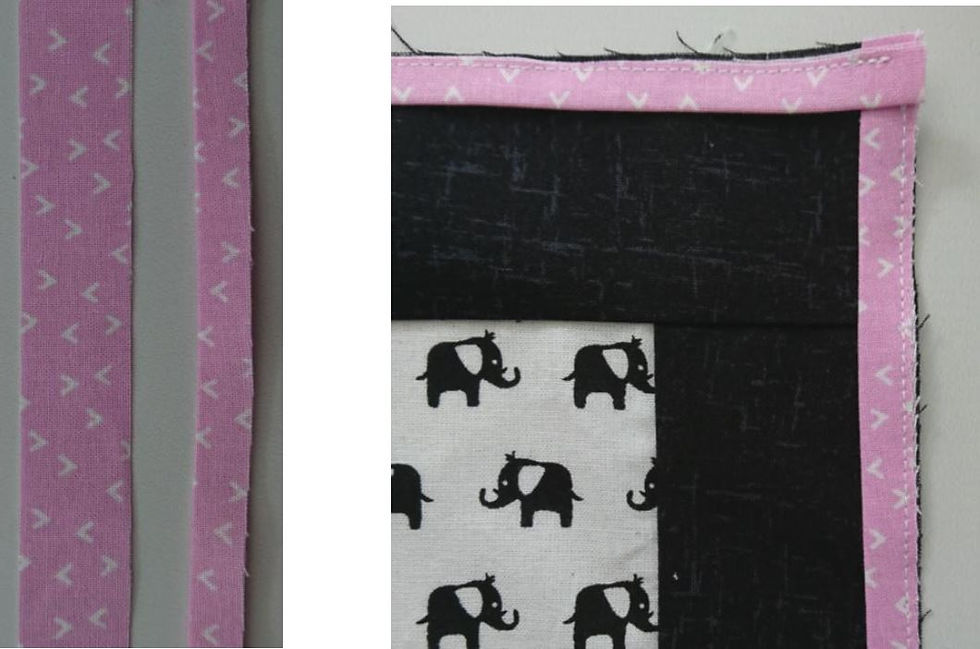
Cut 2 ½” strips from the black fabric with white ‘v’ print, and join to make your strips long enough using the bias binding method, lay your strips RST, and draw a diagonal line, and sew along this line, trim away the excess - see photos

Step 12
Press and attach to the main quilt, using a scant ¼” over the top of the pink strip. Stop and restart at each corner. This is the top quilt complete.


Baste your top quilt to the craft cotton heritage wadding, using basting spray 505, or pins.
Step 13 Making the back … Take the remaining black panel and sew it between the two rows of blocks.

Trim this block to measure 33” width x 34” length.
Step 14
From the blue fabric; cut two strips measuring 33” x 8”, sew to the sides of the quilt cut two strips measuring 48” x 8”, sew to the top and bottom of the quilt. Baste the top quilt to the backing – making sure it is central (the backing quilt will be larger)


Step 15
Using a mixture of the two fabric markers, draw around the balloon templates on the top quilt, in various places. Using the Gutermann blue or pink thread, free motion quilt along these marks, adding the string details like before (sew through all layers of the quilt). Free motion quilt around the blue balloons in the centre panel and add string details (go over previous lines)

Step 16
Fold back the blue fabric, and trim the top quilt and wadding, so the black boarder measures 2”. Trim the blue fabric to sit 3 ½” wider than the top quilt. Fold and press over ½” of the raw edge of the blue fabric.

Step 17
Fold blue fabric over, to overlap the black fabric by ¼”, pin in place. Create neat corners, by removing excess fabric. Sew in place.


Press and your monochrome zoo quilt is complete.


This ‘Monochrome Zoo Quilt’ and tutorial has been created by me - creativeblonde.
To see more of my tutorials, you can follow my blog www.creativeblonde.co.uk and/or Instagram page www.instagram.co.uk/creativeblonde66 and www.facebook.com/creativeblonde66 Stockist for the fabrics found in this tutorial www.craftcotton.com 0161 832 9431 Stockist for Gutermann threads gutermann@stockistenquiries.co.uk 01453 883581 Stockist for Vlieseline interfacing and Vlieseline Bondaweb www.ladysewandsew.co.uk 01628 890 532
Made by Michelle Roberts for The Craft Cotton Company 2018


Comments