

Meow Cat Bed
- Craft Cotton Co
- Jun 18, 2020
- 3 min read
Project by Marie Pickles

You will need:
Dimple fabric
Wadding
2 packs of Cat Fat Quarters
Step1
Select your chosen fat quarters and cut 5” squares using a rotary cutter, ruler and mat or with scissors if preferred.
I needed 20 for this bed laying them out in 4 rows of 5 across.
Pin together then sew into rows.Press all seams in the same direction and then sew the rows together making sure your points match.This time press the seams in the opposite direction (if you remember)

Step 2
Matching the points really does make the quilted base look better and quilting the wadding and top is much easier.
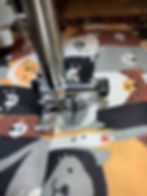
After pressing turn the fabric over so the pretty side is facing down and lay 3 or 4 layers of wadding on this. Press all these layers together and put a few pins in to hold. Alternatively, you can use a spray glue to hold or baste with a needle and thread. Turn over to pattern facing and pin well as you now need to quilt all the layers together. I quilted down every seam to make it stable.

Step 3
Trim all sides of the quilt ensuring it is square, cut a piece of dimple fabric approx. 1cm larger and pin it to the back covering the wadding. Sew on machine or by hand very close to the edge as this will be covered with binding.
Cut strips of fabric 2.5” wide and sew enough together to bind all 4 sides. Attach to the cotton quilted fabric and flip the binding to the back of the quilt hand sewing it to the dimple fabric.
Set aside.


Step 4
Making the cushioned back and sides:-
Using wadding make 3 rolls as in photo 7 for the back and each side. I rolled the wadding and sewed it by hand into bolster shapes.
Measure the circumference of the roll and add a further 6-8” this is the depth of the next fabric cover needed. Measure the width pf all the rolls and add another 6” this is the total length for the bolster overall. Cut your fabrics to join together into a rectangle. Fold in half and sew the long side.
Slide the rolls into the tube making sure the longest is in the middle. Manipulate the roll so the rolls are at the top of the tube and the seam is at the bottom. Pin along the length and run a line of stitching fairly close to the stuffed roll. This ensures everything stays in place and leaves a flap to secure the bottom of the cat bed in place with your fixing of choice e.g. poppers, Velcro.


Step 5
I used large metal capped poppers to keep the bottom in place these photos show placement and how to fit
The bottom can be taken off to wash or to use as a little mat on a sofa or chair. The bolster roll folds around the bottom on 3 sides and fixes in place loosely.
The main bed can be used with either the quilted cotton side facing up for your furry friend to lie on or the soft dimple fabric.
Finally, I made a stuffed cushion in the same fabrics and it can be snuggly fitted into the bed for yet more comfort. It’s a simple pillow sized to fit. It's filled with polyester stuffing and securely sewn closed for washing purposes.


Made by Marie Pickles for The Craft Cotton Company 2020